


This device works with the ADT Pulse and Command Systems.
Pulse Garage Door Remote Controller
GD00Z-8-ADT

Overview
The Garage Door Remote Controller with built-in Z-Wave® technology provides easy remote operation of your garage door opener. The main components of this system—the Controller and the Tilt Sensor—are easy to mount and set up, and once paired to your ADT Pulse system, work together to allow you to open, close, and check the status of your garage door from virtually anywhere.
Setup
If your Virtual Appointment has not been scheduled, please call (800) 493-7807. This product requires an ADT Virtual Agent to complete the connection of the sensor to your equipment. Your virtual agent will walk you through setting up your sensor.
Pre-Setup for Virtual Appointment
- Determine your preferred method for mounting the Tilt Sensor, using the screw-mount method or the tape-mount method.
- Determine your preferred method for mounting the Controller, either mounted on the ceiling or attached to your existing opener’s hanging supports.
- Verify that you have everything to mount your Tilt Sensor:
- Screw-Mount Method
- Tilt Sensor (included)
- Two Screws (included)
- Phillips-Head Screwdriver (not included)
- Flat Screwdriver (not included)
- Drill and 1/16” Bit (not included)
- Ladder (not included)
- Tape-Mount Method
- Tilt Sensor (included)
- Mounting Tape (included)
- Alcohol Wipes/Rubbing Alcohol (not included)
- Ladder (not included)
- Screw-Mount Method
- Verify that you have everything you need to mount the Controller:
- Ceiling-Mount Method
- Controller Unit (included)
- Mounting Screws & Anchors (four sets are included)
- Drill and 3/16” Bit (not included)
- Phillips-Head Screwdriver (not included)
- Ladder (not included)
- Mounting-Bracket Method
- Controller Unit (included)
- Optional Adjustable Mounting Bracket (included)
- Screw (included)
- Mounting Hardware (two sets of bolts and nuts are included)
- Ladder (not included)
- Ceiling-Mount Method
- Take a picture of the 40-digit key code on the bottom the Controller; you will need to have this number handy during the enrolling process.

- Test the garage door opener by opening and closing the door using the button on the wall, making sure the door opens and closes fully.
- Use the alcohol wipes or rubbing alcohol to clean the area where the Tilt Sensor will be affixed and let the area fully dry before mounting.
You are now ready for your Virtual Appointment!
If you would like to begin with the setup before your appointment, please follow the instructions below.
Mounting the Tilt Sensor
The battery powered Tilt Sensor attaches to the top panel of the garage door.
Pre-Setup: Before setting in place, activate the Tilt Sensor by pulling and removing the battery protection strip.
Screw-Mount Method
- To access the mounting plate, open the sensor case by inserting a small flat screwdriver in the case slot and twisting it.
- Attach mounting plate to the top panel of the door and make sure the arrow is pointing up.
- You may need to drill two 1/16” pilot holes for the screws.
- Snap the Tilt Sensor onto the mounting plate and make sure the arrow on the sensor is pointing up.
Tape-Mount Method
- Clean the area where the sensor will be affixed and let it all fully dry before mounting.
- Use the double-sided mounting tape supplied. Peel off the back of one piece of the double-sided mounting tape and place on the back of the Tilt Sensor.
- Peel off the other side of the double-sided tape. Mount the Tilt Sensor to the top panel of the garage door, making sure the arrow on the sensor points up. Press firmly.

Congratulations! You are ready for the next step. Our Virtual Agent will contact you at your appointment time to complete the installation. We will connect your sensor to your ADT Command System so that it can be monitored. The virtual agent will verify the following:
✔ All test signals have been received.
✔ Your new sensor is labeled correctly on your touchscreen and in your Pulse app.
✔ If desired, notification settings are enabled, and notifications are being received on your device.
✔ Teach you how to best use your new sensor.
Connecting Garage Door Controller to ADT Pulse System
Before the Garage Door Controller system can be used, you will need to connect it to the ADT Pulse system via the web portal. To do this, use the included power supply to plug the Controller device into an outlet close to your ADT Pulse Gateway, and with an internet-connected device handy, follow the steps below.
- Prior to adding this device to any Z-Wave network, or after removing it from any Z-Wave network, it is recommended that the Controller be factory reset. Reset the Controller by pressing the Include button 5 times. A quick beep followed by a longer beep will indicate proper reset of the Controller.

- In a web browser, access the Pulse portal.
- Enter your Username and Password, then click the Sign In button.

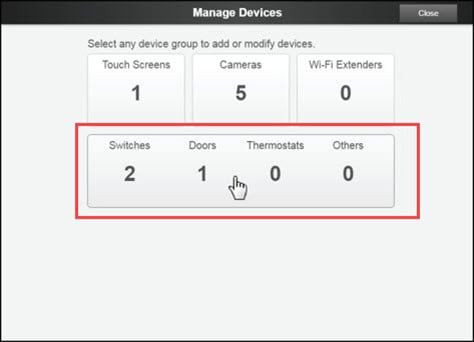
- In the Pulse portal, select the System tab, then click the Manage Devices button. The Manage Devices window opens.
- In the Manage Devices window, click Switches/Doors/Thermostats/Others. The Z-Wave Devices screen is displayed.
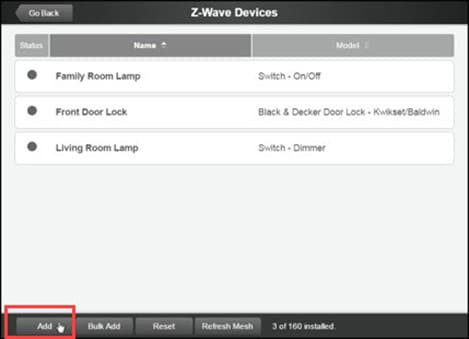
- At the bottom left of the Z-Wave Devices screen, click Add. The Add Z-Wave Devices screen is displayed.
- On the Add Z-Wave Devices screen, click Continue.
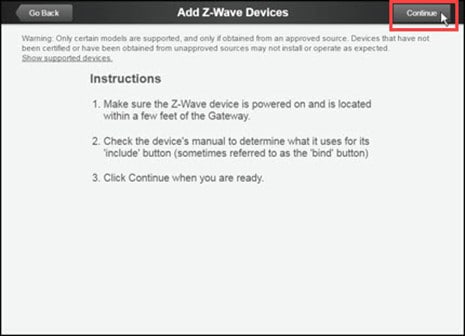
- Press and hold the Garage Door Controller’s Include button for 1 second.
- Wait while the system finds the Garage Door Controller.
- Note: This stage can take 1 to 3 minutes. Hearing three short beeps also indicates that the Controller has been successfully added to the system.

- Note: This stage can take 1 to 3 minutes. Hearing three short beeps also indicates that the Controller has been successfully added to the system.
- When the device is successfully recognized, the Z-Wave Device Details screen opens. Enter a name for the device, and then click Save at the upper right.

- Click Go Back, and then Close to exit Manage Devices.
- Click Close again to confirm.
Mounting the Controller
The Garage Door Controller is typically mounted on the garage ceiling, near the garage door opener and a power outlet. As an option, you can attach it to your door opener’s hanging supports.
Keep in mind that the Controller needs to be located where you will have a clear, unobstructed view of its warning light, regardless of the door position.

Pre-Setup
- To avoid accidental door opening during the mounting process, make sure to unplug the garage door opener from the power outlet before continuing.
- Determine where you are going to place your Controller, either mounted on the ceiling or attached to your existing opener’s hanging supports using the supplied mounting bracket.
Ceiling-Mount Method (typical)
- If necessary, drill four 3/16” pilot holes for the screws.
- Using the four anchors and screws provided, mount the Controller to the garage ceiling, near the opener.
Mounting-Bracket Method (alternate)
- Determine the mounting orientation that works best based on your existing setup.
- The adjustable bracket can be snapped onto the indent on the end or on either side of the Controller, providing three ways to fit onto the Controller.
- Snap the adjustable mounting bracket onto one of the indents on the Controller.
- Secure it with the short screw.
- Use the supplied bolts and nuts to attach the mounting bracket to the opener’s existing hardware, making sure the warning lamp always remains visible.

Wire the Controller to the Opener
Now that the Controller is mounted, you will connect it to your garage door opener using the two connection wires. Follow the steps below.
- Note: The garage door opener should remain unplugged from the power outlet for this step.
Connecting the Wires
- Look at the back of your garage door opener and locate the pushbutton terminals.
- Keep in mind that terminal names and locations vary by manufacturer.
- Then, connect the Controller’s connection wires to the two pushbutton terminals. The wires can be connected to either terminal.
- Do not disconnect any wires currently connected to the Garage Door Opener.
- Be sure the wires do not interfere with any of the moving parts of the door and opener.
Connecting the Power Supply
For this step, you will need:
- Power Supply (included)
- Bracket with Screw (included)
- Zip Tie (included)
- Screwdriver (not included)
- Wire Ties (not included)
- Plug the Power Supply cord into the power input jack on the Garage Door Controller.
- Carefully join the Power Supply with the bracket.
- Next, remove the outlet faceplate screw.
- Plug the Power Supply and bracket into the 120 VAC outlet.
- Be sure the outlet is not controlled by a switch. It must be powered at all times.
- Align the hole in the bracket with the hole in the outlet; secure with provided screw.
- Secure the bracket with the provided zip tie strap.

Opening and Closing the Garage Door
After the installation is complete, the garage door opener can be activated by the ADT system and the door’s status can be viewed through the system.

- Plug the garage door opener back into the power outlet.
- To synchronize the system, cycle the door open and closed using the garage door opener’s wall button.
- Use the ADT App to activate the garage door.
- Refer to Usage section below for instructions to set this up.
- Verify that the Garage Door Controller beeps and flashes for five seconds before the door moves.
- The door should then open or close.
- Verify that the ADT Pulse system indicates the open or closed status of the garage door.
Features and Usage
Features
Remote
Open or close your garage door using your smartphone and the ADT Pulse app. Once connected, the Controller works like your current garage door button. Simply press the icon on the app and the door will open or close.
Safety
Audible and visual warnings prior to door movement provide a safe way to remotely open and close your garage door.
Usage
To use the Pulse ADT app to open and close your garage door, follow these instructions.
- Access your Pulse app. Tap the Menu icon (three lines) in the upper left corner.
- Tap Locks & Garages to view the All Locks screen. Your garage door Controller is represented by a tile that includes the name and status of the device. Tap the tile to Lock/Close or Unlock/Open the garage door.

- If the door does not completely open or close after remote activation, the Controller will allow you to try to operate the door one more time.
- If the second attempt fails, the Controller will go into lock-out mode. See next bullet.
- If the Controller is in lock-out mode and will not accept remote commands, activate the door from the pushbutton wall console.
- Once the Controller has initiated the movement of the garage door, another command cannot be sent for 30 seconds. This eliminates the chance of “bouncing” the garage door and possibly damaging the garage door opener.
Troubleshooting
If Something Is Not Working
Refer to the following table for information regarding possible problems and solutions if the Garage Door Controller is not operating as expected.
| PROBLEM | POSSIBLE CAUSE | CORRECTIVE ACTION |
| The Controller does not flash or beep when activated. | No power to the Controller. |
|
| The Controller flashes and beeps when activated but the door does not move. | Obstruction blocking the door or incorrect wiring. |
|
| Garage door opens or closes, but the status does not change on the touch screen or mobile app. | The Tilt Sensor signal is not being received by the Controller. |
|
Low Battery—Tilt Sensor
When the battery in the Tilt Sensor is low, the system will notify you. You should replace the battery as soon as possible. You can find the appropriate battery at many retail stores.
Battery Required: One CR2032 coin cell battery.
To replace the battery:
- Use a small screwdriver to open the Tilt Sensor case.
- Remove the used battery and insert a fresh CR2032 coin cell battery, with Plus (+) side facing up.
- Return the Tilt Sensor to the garage door top panel and snap it onto the mounting plate, with the arrow on the side of the Tilt Sensor point up.

An ADT technician who will work with you over the phone. The Virtual Agent will verify the following:
✔ All test signals have been received.
✔ Your new sensor is labeled correctly on your touchscreen and in your Pulse app.
✔ If desired, notification settings are enabled, and notifications are being received on your device.
✔ Teach you how to best use your new sensor.
The ADT Garage Door Controller allows you to open or close your garage door using your ADT remotely via the Pulse web portal or mobile app.
The Garage Door Controller connects to ADT Pulse, via a Z-Wave communication, and to your mounted garage door opener unit. Once connected, the Controller works like your current garage door button. Simply press the icon on the portal and the door will open or close.
As a safety feature, when you trigger the door to open or close, a warning indicator light flashes and a beeper sounds for 5 seconds before the door begins to move.

